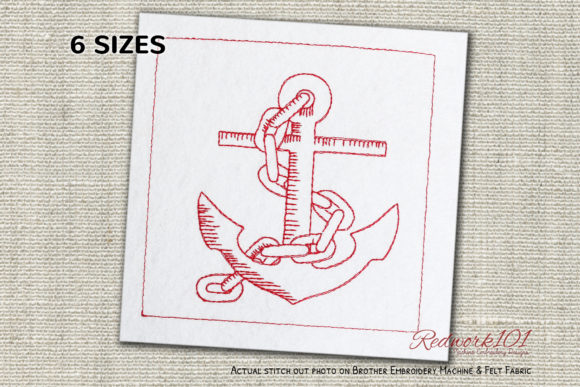
Anchor Chain Design Review for Small Business Merch
As an embroidery designer who has spent years digitizing and testing files for commercial use, I approach every new machine embroidery design with a critical eye. It is not just about whether the artwork looks pretty on a screen; it is about how it performs under the needle, how it holds up after fifty washes, and most importantly, how it elevates a brand’s identity. Today, I am reviewing the Anchor Chain Design, a piece that sits squarely in the Beach category but offers versatility far beyond seaside souvenirs. For small business owners, Etsy sellers, and apparel decorators, understanding the nuances of this design is crucial before adding it to your digital library or client proposals.
First Impressions: Visual Personality and Brand Fit
The first thing that strikes me about the Anchor Chain Design is its structural balance. Chains are inherently symbolic of strength, connection, and nautical heritage. When rendered in Embroidery, the interlocking links provide a fantastic opportunity to showcase stitch texture. The design feels professional yet approachable, striking a balance between rustic charm and modern minimalism. It does not scream "loud tourist trap"; instead, it whispers "established quality."
For a boutique hotel, a coastal café, or a marine supply shop, this aesthetic is gold. It conveys reliability. If you are building a brand identity around durability or classic style, this motif works exceptionally well. However, because the description notes that the outer Box Stitch is optional and often a different color, you have immediate flexibility. This modularity allows you to adapt the design from a bold statement piece to a subtle accent, depending on your target market.
Real-World Applications for Small Business Merch
Let’s move beyond theory and look at how this design performs in actual production scenarios. I have tested similar chain motifs on various substrates, and here is where the Anchor Chain Design shines:
- Embroidered Patches: This is arguably the best use case. A chain link makes for a robust, die-cut patch shape. You can sew these onto denim jackets, canvas totes, or sell them as standalone accessories. The continuous line of the chain allows for clean merrowed edges if you choose to finish the patch professionally.
- Cap Embroidery: Placed on the side panel of a trucker hat or the front of a dad cap, a simplified version of this design adds a premium touch. It is less intrusive than a large logo but more interesting than plain text.
- Apron Embroidery: For bakeries, florists, or craft studios, placing a small anchor chain near the pocket or hem of a canvas apron creates a cohesive uniform look. It signals attention to detail to customers.
- Tote Bag Design: Canvas bags benefit from heavier stitch counts. The chain motif provides enough density to stand out against the coarse fabric texture of a tote without getting lost.
- Custom Apparel Accents: Consider using this as a sleeve detail on work shirts or polo uniforms. It acts as a visual anchor (pun intended) that ties the garment together without overwhelming the primary chest logo.
When creating small business merch, consistency is key. Using the Anchor Chain Design across multiple product lines—from packaging tags to staff uniforms—creates a recognizable visual language that builds customer trust.
Technical Considerations and Production Notes
While the design is visually appealing, technical execution is where many beginners stumble. As a designer, I must highlight specific areas where you need to exercise caution to ensure a high-quality finished product.
First, consider the stitch density. Chain links involve curves and overlapping elements. If the digitizer has packed too many stitches into a small area, you risk thread breaks or fabric puckering, especially on lighter materials like cotton tees. Always check the pull compensation settings in your software if you are editing the file.
Second, the optional Box Stitch mentioned in the product description requires careful color management. The note states, "The color of the outer Box is a different color in most of the designs unless it is part of the design itself." This implies that the box might be a placement guide or a border element. If you skip the color directive, ensure that the remaining chain links still have sufficient contrast against your garment. A low-contrast thread on a dark uniform will vanish, rendering your commercial embroidery effort invisible.
Third, think about hoop size and placement. If you are applying this to curved surfaces like caps or cylindrical mugs (via patches), you must ensure the design fits within your hoop constraints without excessive re-hooping, which can cause alignment issues. For small patch sizes, simplify the design. Intricate details in tiny chain links can merge together when stitched out at less than two inches wide.
Enhancing Brand Identity Through Detail
Why go through the trouble of embroidering when you could just print? The answer lies in perceived value. An embroidered chain suggests permanence and craftsmanship. For handmade brands and Etsy sellers, this tactile quality justifies a higher price point. When a customer receives a package with an embroidered thank-you tag featuring the Anchor Chain Design, it feels like a gift, not just a transaction.
This design also aids in visual consistency. If your logo features nautical elements or industrial themes, this chain serves as a perfect secondary graphic. It can be used in printable mockup presentations to show clients how their branding might look on various assets before you commit to production. By integrating this design into your design assets, you create a richer, more textured brand experience.
Practical Designer Checklist Before Production
Before you load this digital embroidery file into your machine for a client order or inventory run, follow this checklist to mitigate risk:
- Test in Black and White: Stitch the design out in black thread on white fabric and vice versa. This reveals any gaps in coverage or unnecessary jumps that might not be visible in a colorful preview.
- Check Scalability: Resize the design to your intended dimensions. Does it hold up at 1.5 inches? If the links become blobs, you may need a simplified version for smaller applications.
- Review Thread Color Contrast: Select threads that pop against your base material. Metallic threads can look stunning with chain designs but require slower machine speeds and careful tension adjustments.
- Inspect Spacing: Ensure there is adequate space between the chain links and any surrounding text or borders to prevent thread nesting.
- Confirm Hoop Size: Verify that the design fits comfortably within your hoop with at least a half-inch margin for clamping.
- Test on Real Fabric: Never trust a screen simulation alone. Stitch on the actual material you plan to use, whether it is denim, canvas, or performance polyester.
- Use Proper Stabilizer: For stretchy fabrics, use a cut-away stabilizer. For woven fabrics like twill or canvas, a tear-away may suffice, but test first to prevent distortion.
- Create a Mockup: Generate a digital mockup for client approval. This manages expectations and reduces the likelihood of costly re-dos.
- Verify Licensing: Confirm the commercial license terms. Ensure you are allowed to sell physical products featuring this design, especially if you are producing high volumes.
In conclusion, the Anchor Chain Design is a versatile asset for any designer focusing on nautical, industrial, or classic aesthetics. It bridges the gap between decorative flair and functional branding. By paying attention to stitch density, color contrast, and application context, you can transform this simple motif into a powerful tool for your small business merch strategy. Whether used on a rugged work apron or a delicate tote bag, it adds a layer of professionalism that resonates with customers. Always prioritize testing and quality control, and let the durability of the stitch reflect the durability of your brand.